How to Install WSL2 on Windows 10/11
How to install WSL2 on Windows 10 or 11 and get a Linux environment ready for development.
What is WSL?
I wanted Linux tools without giving up Windows, and WSL2 was the compromise that finally worked for me. WSL1 had important limits. WSL2 runs a full Linux kernel and handles Docker much better.
Before WSL, the choices were usually a virtual machine, dual boot, or a separate Linux machine. WSL keeps Windows as the host while giving you a Linux environment in the same workflow.
This article walks through installing WSL2 and Ubuntu on Windows 11. The same process works on Windows 10, with a few version details to check.
Prerequisites
- A 64-bit or ARM64 machine running Windows 10 or 11
- Windows Terminal (optional)
- A cup of coffee ☕
- A lot of love for Windows
- An attraction to Linux
Installing WSL
If you’re running Windows 10 version 2004 or higher (Build 19041 and higher) or Windows 11, then the installation process is pretty straightforward. You can enable WSL by running these commands in PowerShell (as an administrator):
wsl --installThis command will enable WSL and all important features if not enabled, install the latest version of Ubuntu, and set it as the default distribution. If you want to install a different distro, you can do so by running the following command:
wsl --install -d <DistroName>To see a list of all available distributions, you can run the following command:
wsl --list --onlineIf you’re running an older version of Windows 10, then you have to enable WSL manually. To do that, open PowerShell as an administrator and run the following commands to enable WSL and the Virtual Machine Platform features:
dism.exe /online /enable-feature /featurename:Microsoft-Windows-Subsystem-Linux /all /norestart
dism.exe /online /enable-feature /featurename:VirtualMachinePlatform /all /norestart
Restart your system after it’s done (it’s windows after all). After restarting, download and install the Linux kernel update package from here. Once the installation is complete, set WSL2 as the default version by running the following command in PowerShell as an administrator:
wsl --set-default-version 2Once you’ve enabled WSL, you can install your favorite Linux distribution from the Microsoft Store. I’ll be installing Ubuntu 20.04 LTS in this article, but you can install any distribution you want.
Here are some of my favorite distributions:
| Name | Microsoft Store Link | Direct Download Link |
|---|---|---|
| Ubuntu 22.04 LTS | Open | Download |
| Ubuntu 20.04 LTS | Open | Download |
| Kali Linux | Open | Download |
| Debian | Open | Download |
| Fedora Remix for WSL | Open | Download |
Launching WSL
Once you’ve installed your favorite distro, you can launch it from the start menu. You can also launch it from the command line (outside WSL)
wslor if you have multiple distros, then you can select the one to launch by running:
wsl -d <DistroName>The first time you launch WSL, you’ll be prompted to create a username and password (the password won’t be visible when you type it, so fear not, your keyboard is working). This username and password will be used to log in to your WSL distribution. They can also be used to run commands with sudo. Mind you, this username and password is different from your Windows username and password.
Windows Terminal (Optional)
Windows Terminal is a new, modern, fast, efficient, powerful, and productive terminal (oof, that’s a lot of praise) application for users of command-line tools and shells like Command Prompt, PowerShell, and WSL. It’s a great tool for people who use the command line a lot. I personally prefer it to the default command prompt and PowerShell. I love how beautify and super customizable it is. The source code has been open-sourced, so if you have the experience to contribute, then go for it. What I love the most about it is the multiple tabs and pane feature, just like in Browsers, or Windows 11 File Explorer. Having more than one tab open at the same time in one window is so convenient for me.
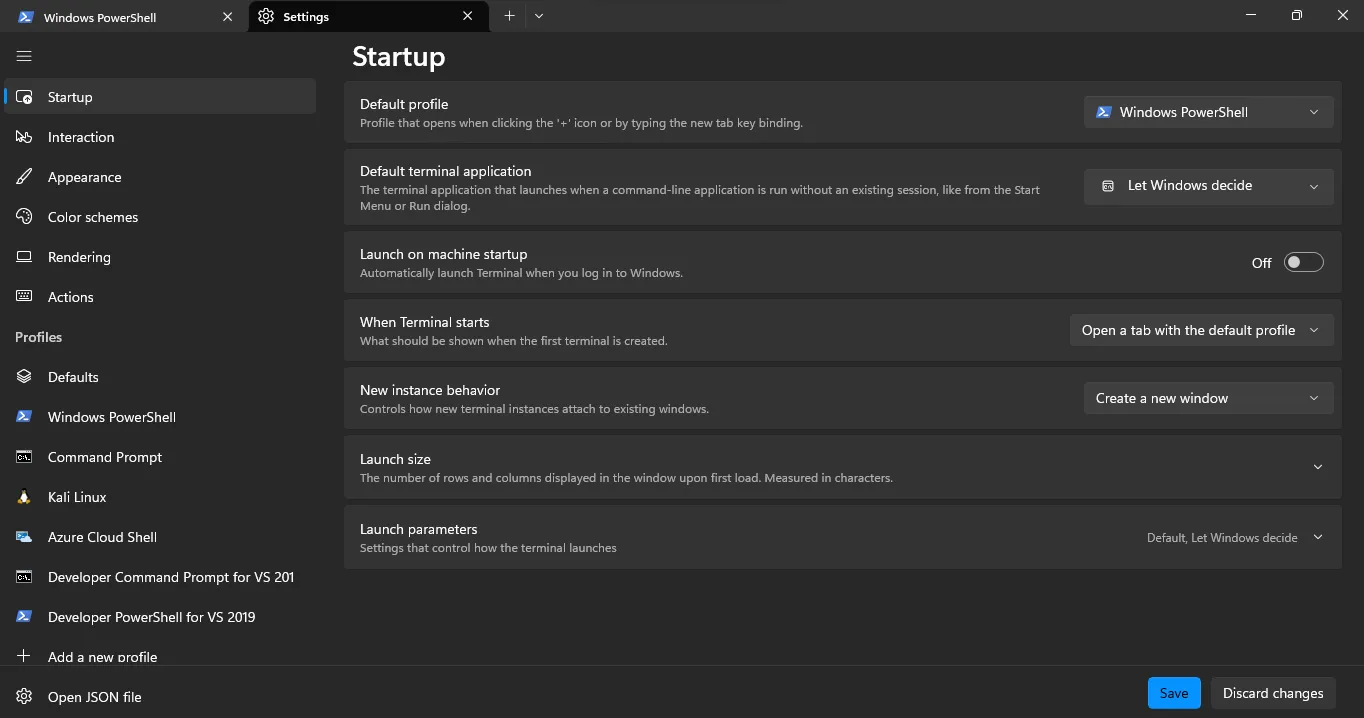
You can download Windows Terminal from the Microsoft Store here. It should be available from the start menu once installed. When you open the Terminal, the default shell opened is usually Powershell. You can open other shells by clicking on the down arrow next to the plus icon. Ctrl + Shift + T opens a new tab and Ctrl + Shift + D a new pane. You can also change the default shell (for fresh launch and when you click the plus icon) by clicking the drop-down arrow next to the plus icon and selecting Settings. This will open the Settings in a new tab. You can also open the Settings by pressing Ctrl + ,. In the Settings, you can change the default shell by changing the DefaultProfile dropdown. There are a lot of other settings in this page, so feel free to explore and change stuffs like theme, font, etc.
File System & Explorer
WSL2 uses a virtual hard disk (VHD) to store the Linux file system. This means that the Linux file system is stored in a single file on your Windows file system. This file is located at C:\Users\<username>\AppData\Local\Packages\CanonicalGroupLimited.Ubuntu20.04onWindows_79rhkp1fndgsc\LocalState\ext4.vhdx (Ubuntu) or C:\Users\Koshna\AppData\Local\Packages\KaliLinux.54290C8133FEE_ey8k8hqnwqnmg\LocalState\ext4.vhdx(Kali). While you can access this file from Explorer, you can’t open it.
To access the files in your WSL from Explorer, enter \\wsl$ in the address bar. You can also see your distro listed in the left sidebar of Windows Explorer. For command line freaks, you can access your files from the command line by running the following command (inside the WSL2 distro):
explorer.exe .Basic WSL Commands
Here are some basic WSL commands that you should know (you can run these commands from PowerShell or Windows Terminal, not from WSL):
| Command | Description |
|---|---|
wsl | Launches the default WSL distribution |
wsl -d <DistroName> | Launches a specific WSL distribution |
wsl -l | Lists all installed WSL distributions |
wsl --shutdown | Shuts down all running WSL distributions |
wsl --unregister <DistroName> | Unregisters a specific WSL distribution |
wsl --export <DistroName> <FileName> | Exports a specific WSL distribution to a tar file |
wsl --import <DistroName> <InstallLocation> <FileName> | Imports a WSL distribution from a tar file |
wsl --set-default <DistroName> | Sets the default WSL distribution |
Memory Management
If you open up Task Manager after using WSL2 for a while, you’ll notice that a process named VmmemWSL is using up a lot of memory. This is because WSL2 uses a Hyper-V virtual machine to run a lightweight Linux kernel with its own memory management system. This is a good thing because it means that the WSL2 VM can use as much memory as it needs to run Linux on Windows. However, it’s so easy for this to backfire since it can easily eat up all your system’s memory if you’re not careful. According to the Microsoft Docs, it can hog up to 50% of total memory or 8GB on builds before 20175 and a whooping 80% of total memory on later builds. That’s a lot of memory, especially if you’re running a low-end machine. To find out how much memory and swap space your WSL2 is allocated, you can run the following command (inside your WSL2 distro):
free -hand you should see something like this:
               total        used        free      shared  buff/cache   available
Mem:           3.8Gi       878Mi       2.6Gi       2.7Mi       622Mi       3.0Gi
Swap:             0B          0B          0B
Mine is lower than the default because I changed it.
You can change these settings by creating a file named .wslconfig in your Windows user directory (C:\Users\<username>\.wslconfig). This file is used to configure global WSL settings. You can also create this file in your WSL2 distribution’s home directory (/home/<username>/.wslconfig) to configure settings for that specific distro. I prefer the global .wslconfig file because it’s easier to manage, but you can use either one.
Here’s what my .wslconfig file looks like:
# Settings apply across all Linux distros running on WSL 2
[wsl2]

# Limits VM memory to 4GB (can be 2GB, 2MB, 1GB, etc.)
memory=4GB

# Set the amount of swap space to 0GB
swap=0

# Enable localhost forwarding
localhostForwarding=true
I’m using a 12GB RAM machine with an i5 8th Gen processor, so I decided to limit the memory to 4GB. You can set it to whatever you want, but I wouldn’t recommend setting it to more than 50% of your total memory. I’ve also set the swap space to 0GB because I don’t want to use any swap space. You can set it to whatever you want, but I wouldn’t recommend setting it to more than 50% of your total memory as well. I’ve also enabled localhost forwarding because I want to be able to access my WSL2 distribution from my Windows machine.
You can visit this page to learn more about the .wslconfig file and the settings you can configure.
Conclusion
And there you have it, Windows and Linux all working together, something I thought was impossible. I hope this article helped you get started with WSL2. If you have any questions or suggestions, feel free to reach out to me through my email. I’ll be happy to help you out.